This look is inspired by all the little things I love about Halsey's style/makeup and matching it with her collab with Mac for her Halsey lipstick! It's a gorgeous matte cool toned grey - I'm obsessed. (I just need to get the balls, for lack of better term, to wear it in public!)
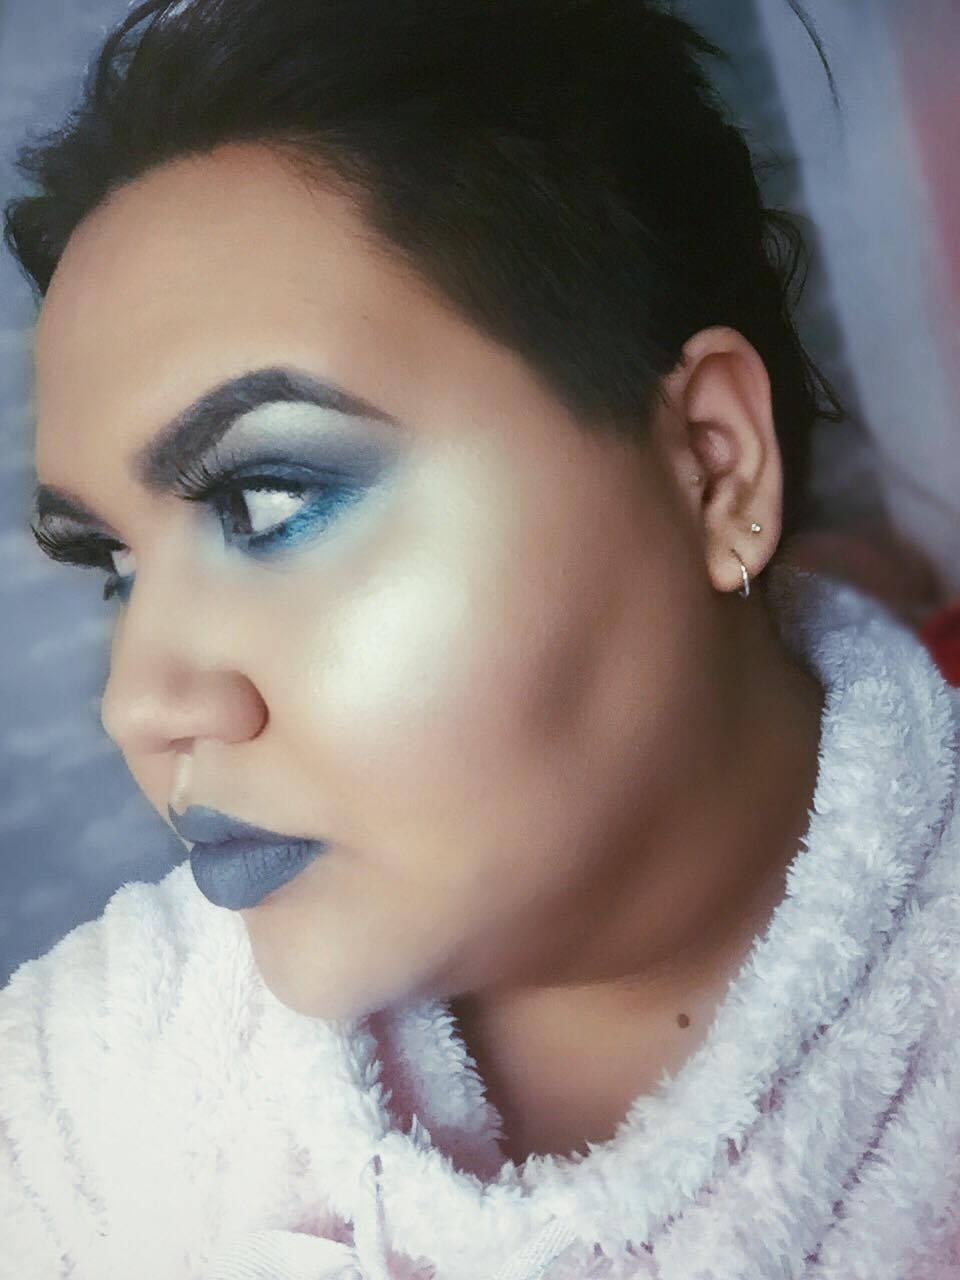
Here's the finished look..
It's a cool toned grey/slate grey metallic lid, the colours inspired from the lipstick she created, a pop of metallic blue under the eye as a nod to her blue hair which was my favourite and her all round obsession with the colour blue, a bright futuristic highlight as I always love her looks with a dewy glow and of course her lipstick on my lips! I'll go into more detail below on what I used for this look and what techniques I used.
For the base and face:
Firstly I moisturised as I have dry skin and apply a light layer of Mac Skin Base Visage to even out my skin. I used the L'Oreal Infalliable foundation in shade 140 mixed with a pump of the L'Oreal Paris Lumi Magique Primer. This adds the most healthy and gorgeous glow. If you're on the dry side like me I definitely 100% would recommend adding this into your foundation - it's gorgeous!
For concealer I use the L'Oreal True Match La Touche Magique, it's a pen like packaging with a brush at the top but this concealer is heavy duty! I find this even brightens up my under eye area a lot more than my Mac Pro Longwear Concealer.
For contour I used my Anastasia Beverly Hills Contour Palette in Medium. For my contour I used the shade Cinnamon. I then set my eye and highlight area with Ben Nye Powder in the shade Banana. For my contour I set that using my Kat Von D Shade and Light Palette and I used the middle, of the three, contour shades.
For my eyes:
On my eyebrows I used my trusty Illamasqua Brow Gel in Stare and filled the ends in with a dark eyeshadow.
Onto my eye lids, I first prepped them with my Mac Pro Longwear Concealer and my face powder. To make sure the silver and grey shades stood out I used the metallic white shade from my Morphe Brushes 35K palette to cover my whole lids to my brow bone and used this for my brow bone highlight.
All shadows I used were from the 35K palette (thank you for recommending Jaclyn Hill!) In the crease I firstly placed a light grey matte shadow and blended it out, I followed with a darker grey shade and kept this closer to my crease this time. I then went in with a dark metallic grey and blended out the crease again going back and fourth until the three shades were perfectly blended. I then took the white shade and lightly sweeped this around the outside of the crease, and into my inner corner area for my inner corner highlight and to make sure it had an airbrushed effect blend on my lid.
For the inner third of my eyelid I placed a metallic sliver shadow as a highlight and to brighten up my grey toned eye. I dampened by brush first to get a gorgeous foil shadow effect on the inside.
Under my eye I used a bright metallic blue eyeshadow from Urban Decay (it was in one of my older palettes) and blended this out with the white shadow. (The blue doesn't show up so well on camera but it's a gorgeous metallic royal blue!)
My eye had a lot going on so I placed a white liner on the inside of my eye to brighten it up again and bring my eyes back out! I decided with the intense shadow not to do a winged liner (shocker!!) and only a long wispy lash as I know this is something Halsey is fond of. She always has gorgeous long and thick eyelash extensions so I used the lashes closest to that I had. I used one of the pairs I got in a 5 pack from ebay I'll link them here, as I know they're not an easy find but they're very cheap!! They're not for the faint hearted though and they're definitely not a 'natural' lash.
Before applying these I coated my eyelashes in my Maybelline Lash Sensational Mascara and applied them using Duo eyelash glue.
For Highlight:
I used my Sleek Highlighting Palette in Solstice. This palette is gorgeous. I used the shade Subsolar for a gorgeous light highlight and from the whole palette I felt the cooler shade matched this look perfectly! See my review here of this palette! I placed on the top of my cheeks, nose and cupids bow with a slight dusting on my chin and forehead of whatever was left on the brush!
On my Lips:
I used the Halsey x Mac lipstick and then I felt it was a little flat in comparison to the rest of the look as it was very matte so I added a little of the Subsolar highlight to the inside of my lips using my finger. I love the metallic effect it gives. I didn't use a lip pencil with this so I cleaned up the edges with concealer and a brush.
To finish off this look I sprayed my face in my NYX Dewy Finish Setting Spray to ensure I stayed flawless and dewy.
This is my finished Halsey inspired look including Halsey Mac Lipstick! Hope you liked this and feel free to recommend me any good products I should be using!
Find me here:
Showing posts with label metallic. Show all posts
Thursday, 5 May 2016
Halsey Inspired Make-up Look - Including my Halsey Mac Lipstick
Labels:
ashley frangipane,
beauty,
grey,
halsey,
inspired,
l'oreal,
l'oreal infallible,
l'oreal paris,
lipstick,
look,
lumi,
mac,
makeup,
metallic,
silver
Friday, 29 January 2016
Good Girl Vibes - Ariana Grande x Mac Viva Glam Inspired Look 2
I posted my Bad Girl Vibes post inspired by the other half of this Ariana Grande x Mac Viva Glam collection yesterday. I really love that look and I want to rock it again soon!
Today, I decided to let my good girl out and do a Good Girl Vibes inspired look using the Lipglass from the collection. It's a gorgeous pinky/clear lipgloss with glitter through it. It photographs well and leaves me lips looking plump and so luscious, which is a great change in this colder weather!
To inspire this look I looked at Ariana's usual every day make up and it consists mostly of flawless skin, a nude coloured lid, a great cat eye, big lashes and a beautiful lip! So I used my usual base with a subtle metallic pink eye, a cat eye and the lipgloss!
To recreate this look if you are interested just follow these steps:
Step 1: Moisturise and prime your face. For a flawless finish and longevity this step is so important!
Step 2: For my base I applied a generous amount of Kryolan TV Paint stick and blended this in using a damp beauty blender (I have real techniques version). I then contoured my face using my Anastasia Beverly Hills Cream Contour Kit. Using the two lightest contour shades mixed under my cheekbones, around my forehead, under my chin and at the end of the bridge of my nose. I blended this using my Real Techniques Face Expert brush.
I then added concealer under my eyes and where I want to highlight. (forehead, cheekbones, bridge of my nose, cupids bow and just a small amount on my chin.)
Step 3: To set this I used loose powder under my eye and left it on to 'bake'. (Check youtube tutorials if unsure) I then powered my face where I get oily during the day and used Mac Blush in Harmony to contour.
Step 4: For my eyes I applied a transition colour in my crease. I used Stark from the Gwen Stefani x Urban Decay Eyeshadow Palette. On my lid and slightly above I used Maybelline Colour Tattoo 24hr Eyeshadow in Pink Gold and set it with Harajuku from the Gwen x UD Palette. I then went over the lid with Pop from the same palette to add a slight bit of glitter.
Step 5: I used a fluffy brush to wipe away the excess powder and fallout under my eye.
Step 6: I went in with Anaheim from the Gwen x UD Palette at my waterline and Blonde from that Palette on the inside of my eye with a small amount of Pop on top.
Step 4: I added a large winged liner (Wet n' Wild Liquid Liner) like Ariana usually has and a coat of mascara (Maybelline Lash Sensational) and false lashes. I used Primark lashes in Sultry.
Step 5: I added to my cheek contour with Lo-Fi From the Gwen Stefani x Urban Decay Blush palette that I bought today (Post on that coming soon!), added a pop of colour to my cheeks by using the easy shade for blush and angel for highlight where I had placed my concealer! This palette has everything you could need - so gorgeous!
Step 6: To finish the look I applied a small amount of Mac Soar Lip Pencil to my lips and coated them with the Ariana Grande x Mac Viva Glam Lipglass!
This look is super easy to wear and the eyes could be toned down to a nice cool brown tone to wear something similar to what Ariana probably would!
If you wanna treat yo' self to this lipstick the link is here. ALL proceeds go to the Mac Aids Fund which is amazing and makes spending that money a little easier and makes me a little less guilty lol!
I love to do these make up posts so if you'd want to see more let me know and what looks!
Find me here:
Bloglovin'
Twitter
Instagram
Tumblr
Bloglovin'
Tumblr
(◍•ᴗ•◍) - ♡
xo
M
Labels:
aids,
ariana grande,
blogger,
blush,
eyeshadow,
fotd,
glitter,
glittery,
gwen stefani,
lipglass,
lipgloss,
mac,
mac aids fund,
maybelline,
metallic,
motd,
palette,
urban decay,
viva glam,
wet n wild
Subscribe to:
Comments (Atom)


